Pages

Saturday, 27 September 2014

Come to tea and biscuits

In the days running up to my holiday, I was restless. The Turkish Cay glasses came out and I set out to bake small batches of little nibbly biscuits to go with the copious amounts of tea I'd started drinking. 
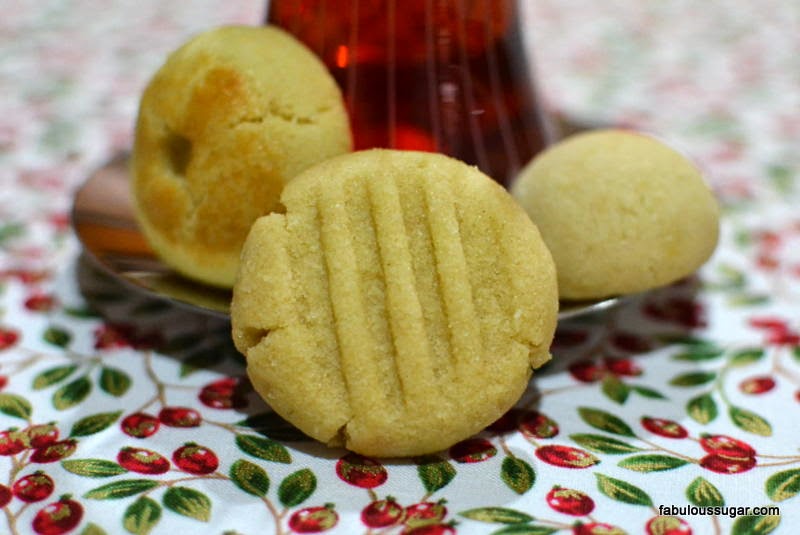

These biscuits were truly a delight. They came together quickly and were melt-in-the-mouth delicious. Perfect as a pick-me-up or hostess gift in a hurry. Or perhaps for no reason at all but to accompany glasses of umber-coloured Cay while contemplating the endless delightful possibilities awaiting on your holiday.


Chinese Almond Biscuits
Adapted from BreadetButter

150g Plain Flour
100g Ground Almonds
65g Caster Sugar
Scant 3/4 teaspoon Baking Powder
Scant 3/4 teaspoon Baking Soda
1/2 teaspoon Vanilla Essence
A few drops Almond Essence
A pinch of Salt
100ml - 150ml Grapeseed Oil (or any other odourless Oil)
1 Egg White, beaten

Preheat the oven at 140 Celsius. Line a baking tray and set aside. 

Put all the dry ingredients into a mixing bowl. Whisk everything together. Make a well in the centre and add in the Essences and a little of the Oil. 

With clean hands, gently bring the dry ingredients into the wet. Add the Oil little by little as you go until you have a soft, crumbly dough that comes away from the sides of the bowl cleanly. (depending on the weather and type of Oil used, you may need slightly more or less of it than stated in the recipe)

Roll into little balls and place on the baking tray. With a chopstick, make indents in the centre of each biscuit. Brush each biscuits with the Egg White. Bake at about 150 Celsius for about 20 - 25 minutes or until the tops turn a light golden brown. Leave to cool on the tray before storing in an airtight container.


Variation:
Coconut Oil Almond Biscuits

150g Plain Flour
50g Ground Almonds
60g Caster Sugar
1/2 teaspoon Baking Powder
1 teaspoon Vanilla Essence
A pinch of Salt
6 - 8 tablespoons of liquid organic virgin Coconut Oil

Preheat the oven at 140 Celsius. Line a baking tray and set aside. 

Put all the dry ingredients into a mixing bowl. Whisk everything together. Make a well in the centre and add in the Essence and a little of the Oil. 

With clean hands, gently bring the dry ingredients into the wet. Add the Oil little by little as you go until you have a soft, crumbly dough that comes away from the sides of the bowl cleanly. (depending on the weather and type of Oil used, you may need slightly more or less of it than stated in the recipe)

Roll into little balls and place on the baking tray. Bake at about 150 Celsius for about 20 - 25 minutes. Biscuits will not turn brown, but to avoid over-baking remove from the oven at the time specified. Leave to cool on the tray before storing in an airtight container. 


Semolina Almond Biscuits
Adapted from The Little Teochew

100g Plain Flour
60g Semolina
40g Ground Almonds
1/4 teaspoon Salt
1 teaspoon Vanilla Essence
A few teaspoons Ghee

Preheat the oven at 140 Celsius. Line a baking tray and set aside. 

Put all the dry ingredients into a mixing bowl. Whisk everything together. Make a well in the centre and add in the Essence and a little of the Ghee. 

With clean hands, gently bring the dry ingredients into the wet. Add the Ghee little by little as you go until you have a soft, crumbly dough that comes away from the sides of the bowl cleanly. 

Roll into little balls and place on the baking tray. Press down with the back of a fork. Bake at about 150 Celsius for about 20 - 25 minutes. Leave to cool on the tray before storing in an airtight container. 


Thursday, 25 September 2014

Of markets, coffee and fish dinners

It's commonly assumed that a person with a blog while travelling should or would take a gazillion photos to document every single bit of their journey. That's not so much me. While I'll readily admit to wanting to take a gazillion photos like every other person, I'm pretty adamant about enjoying the amazing sights and sounds without whipping out the Nikon every single time. 

Sometimes, it's just best to put away the camera. Stop. Close your eyes. Take a deep breath and open them again while ever so slowly sweeping your gaze across the horizon of wherever you are to simply soak it all in. 

My time away is about the warm feeling that fills your heart while sipping a hot cup of coffee by the sea; shared laughter during dinner time conversation; the coziness of a hug; the coldness of ice-cream on your tongue while a cold wind whips around you; watching the sun go down in a spectacular show of colours and so much more. My time. My feast of senses.

Kemeralti was just that. Probably smaller than Istanbul's Spice or Grand Bazaar, it was still exciting to say the least! 

When you walk in, you're assaulted by the loud, excited chatter of people that you would find in any bazaar across the world; along with smells of hot. brewed cups of Cay and Kahvesi; roasting meats dripping with fat ready to be sliced off and placed on flatbread to sop up its juices; dried peppers and aubergines hanging in bunches from rooftops; twinkling silver catching your eye in the silver shops and so much more. 

The first thing I saw at Kemeralti was this very, very hardworking little Bear. He was busy pounding coffee beans outside a little coffee shop selling what looked like a whole range of coffee. Coffee, coffee, coffee.


Turks seems to have a passion for preserving fruit and vegetables, perhaps because everything is seasonal. There were dried chilli peppers and aubergines almost everywhere.


Ooey-gooey, sticky sweetie that sticks to your teeth and gums. Every colour is a different fruit flavour. The vendor twirls a bit of each flavour on a stick and dips the finished sweet in lemon before giving it to you. I felt like a child again eating it!


After a walk hither-tither peeking into little shops that sold anything and everything, we stopped for coffee just as some buskers came by to entertain everyone. There was some amount of eye-candy (wink, wink) as well, but sorry they're not in the photos! 


More shops! I tried on some pretty Ottoman-inspired necklaces in a silver shop, poked around places selling pots and pans (my favourite!), antiques and inhaled the pungent aroma of spices in the spice shop. 


Then, we were off to Urla for my first fish dinner! It was a perfect dinner that lasted almost 3 hours I think? Or was it 4? Who cares. We started with little plates of Meze and Calamari; then graduated to utterly scrumptious Grilled Prawns with Brown Butter and Fish; with Cay and a complimentary mother-of-all-fruit-platters to finish. All the while being carefully watched over by the neighbourhood cats and hounds. 


The sun set over the sea while we were driving to Urla for dinner. It is quite a spectacular thing to behold in all its glory. 


Wednesday, 24 September 2014

Grumpy, cross Miss loves magic

I don't know about you, but when I return home from a magical holiday I usually am the grumpiest, crossest Miss you ever did see! Still, I'm not as grumpy and cross as I can be this time round. 

Perhaps that's because I came home with a twisted foot and so spent the next few days in a drug-induced daze to kill the pain? Who knows? Either way, I'd give anything to wind back time a bit! 

My first day in Izmir was just about perfect. Picked-up at the airport by a very kind person; breakfast out on the balcony - homemade Turkish Breakfast, if I remember correctly; a nice long walk along the seafront in Alsancak; cold, cold ice-cream and then tea (can't quite remember because I was so sleepy I would have fallen asleep standing-up) out on the balcony again and then a nap. 

A nap that turned into sleep! I slept for almost 4 hours and woke at 9.30pm and trotted out to the balcony to find friends finishing dinner. Got served scrumptious homemade Pumpkin and Ginger Soup which I drank from a mug. That made me feel all warm and lovely inside.   

That's all I can remember from the first day. So I'll leave you with some photos of the walk by the seafront. Hopefully they'll titillate you into paying Turkey a visit!


Sunday, 21 September 2014

I've been away...

I've been away. There will be stories and photos soon of what I think is one of the most beautiful places on earth. Here's a little teaser photo of where I've been.


Saturday, 23 August 2014

Pork Cutlets

I woke to a bright sunny morning today, complete with chirping birds and my favourite Strawberry Smoothie. As I was drinking my Smoothie breakfast, I wondered what I should do for the rest of the day. You see, it's not often that I have a whole, empty day of nothingness presented to me. So today was a treasure. 

With all the healthy eating going on with me these days, I thought that it would be nice to have a slightly un-healthy lunch. I also had all that lovely minced pork in the freezer to use up. Since no one in my family has made my grandmother's Pork Cutlets in a long time, my decision was easy. 

Just like the Fish Cutlets, I knew I was in for a long morning of prep in the kitchen. It's unavoidable with Cutlets. You'll understand why when you read the recipe. 

I had them for lunch with a mixed vegetable stir-fry and brown rice. Delicious and very much like I remember from a time long gone.


PORK CUTLETS

A
300g Minced Pork

B
3 medium-sized Potatoes

Boil, peel the skin off and mash. Set aside.

C
1 medium Red Onion
2 sprigs Curry Leaves
4 small cloves Garlic
Oil

Chop and saute till fragrant in a little Oil. Set aside. 

D
1 teaspoon Cumin seeds
2 teaspoons Fennel seeds
2 teaspoons Ginger Powder

Dry roast in a pan till fragrant. When done, let it cool for a few minutes, then grind into a fine powder in a dry grinder. Set aside. 

E
1/3 cup Cashew Nuts

Dry roast in a pan till lightly brown. When done, let it cool for a few minutes, then grind into a coarse powder in a dry grinder. Set aside.

F
1 Egg, lightly beaten
Salt, to taste
Oil

In a large bowl, place the Minced Pork. Add in the ingredients from B, C, D and E which you already prepared. Add a few pinches of Salt to taste. Then with clean hands or a spatula, mix everything together. Once done drizzle in a little of the Egg and mix it through well. You may not need the whole Egg. Only use enough to bind the mixture. Roll into balls, flatten them slightly and shallow fry in some Oil until brown. Drain on absorbent paper to remove excess Oil and serve immediately. 


Wednesday, 20 August 2014

It's all a certain kind of madness

My camera is a year old and I don't know what I'd do without it. Interesting isn't it? Considering the fact that for years I never 'missed' having it in my life, it's remarkably odd that in the one year it's been with me I've tried to take it everywhere with me, only stopping short when I remember how intrusive it can sometimes be to others. In my case, stopping short happens most of the time, which sadly enough means lost photo opportunities. 


In the past year, I've also read and re-read articles, blogs and whatever written material on photography I can get my eager little hands on like there's no tomorrow. Some make sense, some don't, but the voracious reading continues, rather more than the clicking!


Then there's the lens lust that has taken over part of my life. Which lens is sharpest, which has the best bokeh, which is best for wide-angle, which is the best zoom, which camera models are best, etc. etc. 


I pored over what seemed like a gazillion articles and photos online to decide on a new lens. It had to be perfect. It had to do everything. So to the shops I went, saw and bought. The new lens is far from perfect and doesn't do everything - obviously - but rather, is just the right fit. For me. 


There is a lot of debate between the Nikon 16 - 85mm and the 18 - 200mm. I tried both as well as some other lenses (which were way out of my budget) at the shop and one thing was clear. I'm not the sort of person who carries a bagful of heavy anything anywhere for any amount of time or reason.  


In light of that, it was Mr. 16 - 85mm that came home with me. He cost a pretty penny, so when I got home I went back to reading and re-reading articles that I'd already read about him just to reassure myself that I'd made the right decision. I've now decided I'm perfectly happy with him (despite his sometimes horrifying bokeh) and so he's staying.


As you can see I then promptly took him into the garden for a spin. Looks like I need a lot more practice. Sigh


Saturday, 9 August 2014

Kueh Lapis Legit


Sometimes life hits you with a sledgehammer. You emerge dazed, disorientated and demotivated while wondering what the hell just happened. It takes days, weeks and sometimes months to pick yourself up and out of it. Yet when you finally gain your equilibrium back, there still seems to be a lingering halo of instability following you around for a time before it finally disappears into thin air like it was never there before. 

I've been feeling like that recently. With numerous things going on at work and in life, I felt it was time to shake off the halo sooner rather than later. So I baked. A cake. 

Not a cake for the faint-hearted this one. Anyone will tell you that it takes a borderline OCD and sadistic sort to willingly sit in front of a hot oven on a day of scorching heat to bake precisely measured batter into layers of perfectly even cake. Sometimes that's just what you need. To immerse yourself in something positive to push out the negative. 

I've been wanting to try a Kueh Lapis Legit for a long time. So when I finally found time to do it, I went to town with it and made TWO in just one day. 


It is a cake with many names, variations and appearances. While I like calling it Kueh Lapis Legit, it's also known as Kek Lapis, Kek Lapis Legit, Kek Lapis RempahSpekkoek, Dutch Spiced Layer CakeThousand Layer Cake, Indonesian Layer Cake, etc. Call it what you want. 

Juliet
"What's in a name? That which we call a rose
By any other name would smell as sweet."
Romeo and Juliet (II, ii, 1-2)

Everyone seemed to like one better than the other, so the recipe below (adapted from here) is for the one that truly knocked everyone's socks off. 


KUEH LAPIS LEGIT

A
450g Salted Butter, cold and cubed
2 tablespoons Condensed Milk
100g Caster Sugar
1 teaspoon Vanilla Essence
15 Egg Yolks

B
130g Plain Flour
5g Cornflour
1/2 teaspoon Mixed Spice
1/2 teaspoon Nutmeg

C
5 Egg Whites
100g Caster Sugar

D
A little melted Butter

Preheat the oven at 120 Celsius with Top and Bottom heat. Lightly butter and line an 8 inch x 8 inch x 4 inch square cake tin with baking paper. Make sure the baking paper fits the bottom of the tin perfectly. Do not line the sides of the tin.

Other equipment needed - A thin Cake tester/Skewer/Pin; a Fondant Smoother/Kueh Lapis Press; a Ladle; a Brush for the melted Butter.

B
Mix and sift B together. Set aside. 

A
In a large mixing bowl - preferably a stand mixer - beat Butter until soft. Add in the Condensed Milk, Caster Sugar and Vanilla. Continue beating until pale and fluffy. Beat in the Egg Yolks one by one, beating well after each addition. Remove the bowl from the stand mixer and gently fold in B by hand. 

C
In a separate bowl - you need a hand-held electric mixer for this - whisk Egg Whites until slightly frothy. Add in the Sugar little by little and keep beating until it reaches soft peak stage. 

Gently fold in C by hand into the A and B mixture until well combined. Take care not to knock the air out of the Egg Whites. Set aside. 

Heat the empty prepared tin a little in the oven for a minute. Be careful of the baking paper warping. Press it down firmly if it warps after the tin is warmed and removed from the oven.

Add about 3 measured ladles (level off the top) of batter into the tin. Spread it out with the back of a small spoon and bake at 160 Celsius Top and Bottom heat on the middle rack with the oven door slightly open until golden brown. 

Remove the tin from the oven, prick any air bubbles present and press down gently using the fondant smoother. Brush lightly with melted Butter.

Measure out the next 2 ladles of batter, pour into the tin and smooth with the back of a spoon. Turn the oven to 190 Celsius with Top heat only and bake the second layer of batter on a higher rack with the oven door slightly open until golden brown. 

Remove the tin from the oven. Prick, press, brush, layer and bake as with the first and second layers. Keep going until you use up all the batter. 

After you do the same for the last layer, turn the oven to 160 Celsius with Top and Bottom heat. Bake the whole cake for 5 - 10 minutes on the middle rack with the oven door closed to ensure the cake is cooked through properly. 

Remove the cake from the oven and cool in the tin on a wire rack. Once completely cool, turn the cake out of the tin and cut into slices. 

Notes
  • Ensure you have your day completely free when attempting this cake. It will take about 3 - 4 hours from start to finish if you do it right.
  • Ensure you have all the ingredients and equipment ready at hand before you start the mixing the cake. 
  • It is most convenient to have two electric mixers on hand when making this cake. If not, wash and dry the beaters of your electric mixer well in between mixing A and C. 
  • Make the first layer of the cake slightly thicker than the others as it will provide a firm base for the rest of the cake. 
  • Use only one ladle and measure the batter out carefully while baking to get even layers of cake.  
  • Take care to use Top and Bottom heat or Top heat only where necessary. I left the oven door slightly open when using Top heat only so as to prevent the oven from getting too hot and burning the cake. 
  • Do not walk away or leave the cake unattended at any time. It burns easily. 


Sunday, 3 August 2014

Nasi Lemak

One of my favourite Malaysian foods is Nasi Lemak. What is Nasi Lemak? It's essentially a serving of Coconut Rice accompanied by Ikan Bilis Sambal, fried Peanuts, fried Ikan Bilis, slices of Cucumber and a cooked Egg. I say 'essentially' because it can on one hand be less than that or a whole lot more.

My Perfect Nasi Lemak

Malaysians eat Nasi Lemak for breakfast, lunch, dinner and supper. Next to Roti Canai, it's usually even the food of choice in the wee hours of the morning to end a long night of clubbing. Not a food defined by a time of day. Because we love our Nasi Lemak, you can find it everywhere in all shapes, sizes and tastes. 

For instance, you can have a Prawn Sambal instead of the standard Ikan Bilis Sambal, or even a Dried Squid Sambal. Would you like a boiled Egg to go with that or a fried Egg? A piece of fried Chicken, Chicken Rendang or Beef Rendang? Extra fried Peanuts and Ikan Bilis on the side or none at all? Boiled Rice or Steamed Rice - you didn't know there was a difference did you?

I hope you're getting the picture. In Nasi Lemak-land anything goes. You eat it how you like it, usually bought from your favourite stall... and yes we all have our favourite stalls. Each and every Malaysian you know will be able to tell you which Nasi Lemak is their favourite if you would only ask.  

Even the price-tag differs from stall to stall and shop to shop. The more varied you like your Nasi Lemak, the more expensive it gets. You can pick-up a small packet for RM1 at stalls or coffee shops in the morning for your breakfast, or you can order it a la carte at a local bistro for RM12.90. Then there's the RM20 whopper of a Nasi Lemak from Dome!

I love the Nasi Lemak from the lady who runs the breakfast stall across the road from the office, (most mornings I pretend she's not there and successfully brainwash myself into believing that the Weet-bix waiting for me in the office fridge is better than anything she's selling), but there are times when I succumb to greed.

Still, as much as I love her Nasi Lemak, I love mine too. One cannot have just ONE favourite you know. Where's the fun in that? 

The key to any good Nasi Lemak is the Sambal. A great Ikan Bilis Sambal is better than a poorly made Prawn Sambal. It can make or break the dish. The Sambal is crucial. 

My Ikan Bilis Sambal recipe comes from the old Domestic Science recipe book Resipi Harian. It's a pretty straightforward Sambal that I've tweaked ever-so-slightly to suit me. (Have I ever left a recipe alone? No.) My homemade perfect is just enough sweet-sour-spicy with a balance of Ikan Bilis and Red Onions.

It's not something I make often. In fact, almost hardly ever since a good Nasi Lemak is always just a stone's throw away. So most of the time I think 'Why bother?' Though sometimes, on a lazy Saturday or Sunday morning it's the perfect thing to make... and eat for lunch... comforted by the knowledge that your bed is close by for the snooze that you know will follow.

NASI LEMAK
For 4 servings

Ikan Bilis Sambal
1 medium Red Onion
1 teaspoon Tamarind Paste
Salt and Sugar to taste

Sambal Paste (to blend)
1 medium Red Onion
A knob of Ginger
2 stalks of Lemongrass
2 fresh Red Chillies
6 dried Red Chillies
1 Candlenut (optional)
1cm Belacan (optional) 

Coconut Rice
2 cups of Jasmine Rice
1/4 cup of thick Coconut Milk
2 stalks of Lemongrass
A knob of Ginger
Water

Condiments
1 Cucumber, sliced
4 Boiled Eggs, halved
2 handfuls of Peanuts, fried

2 handfuls of Ikan Bilis, fried (divided)

Boiling the Eggs
Bring a saucepan of water to boil. When just coming to boil, put in the Eggs. Boil for about 10 - 15 minutes depending on how firm you like your Eggs. When done, remove saucepan from heat, drain the hot water off and fill the saucepan with cold water. Let the Eggs sit in the cold water for about 20 minutes. Then, peel the shells. Halve the Eggs, place in a dish and set aside.

Frying the Peanuts and Ikan Bilis
Heat some oil in a wok. When hot, fry the Peanuts. Once done, remove the Peanuts with a slotted spoon and place on absorbent paper to drain off the excess oil. Add a little bit more oil in the wok and do the same with the Ikan Bilis. Once both Peanuts and Ikan Bilis have been drained off oil, place half the Ikan Bilis and all of the Peanuts in a dish together. Set aside.  

Reserve the other half of fried Ikan Bilis for the Sambal.

Slicing the Cucumber
Top and tail the Cucumber. Rub the ends you have cut-off onto the cut part until you see some white foam coming off it. Do the same for the other side. Throw away the topped and tailed ends. Wash the Cucumber in clean water, and slice. Store in a container until needed.

Cooking the Sambal
Ingredients for Sambal Paste - Slice Onions, Ginger and Lemongrass. De-seed and slice fresh Red Chillies. Soak dried Red Chillies in hot water for 10 minutes, drain (reserve the water). Slice the Candlenut. Place Onions, Ginger, Lemongrass, fresh Red Chillies, Dried Chillies; Candlenut and Belacan (if using) into a blender. Add a little of the reserved water from the Dried Chillies (just enough to get the blender going) and blend until you get a paste. Pour into a dish and set aside. 

Slice Onions. Mix the Tamarind Paste with 1 tablespoon of water to make juice.

In a large wok, heat a little Oil. Fry the sliced Red Onions until slightly transparent. Add in the Sambal Paste and cook until the Sambal is fragrant and the Oil floats to the top. Add in the Tamarind juice. Mix through and cook until you see the Oil floats to the top again. Then add in the reserved fried Ikan Bilis, as well as Salt and Sugar to taste. Dish out onto a serving dish and keep warm until needed. 

Cooking the Rice
Skin and slice the Ginger. Cut-off the tops of the Lemongrass and leave the bottoms whole. Gently bruise both Ginger and Lemongrass with a mallet. Set aside. 

Wash Rice in cold water 3-4 times to get rid of excess starch. Add just enough water to come up to half one-third of your finger (see photo). Add in the Coconut Milk concentrate and mix through. Place your palm flat on top of the Rice to level it out. Place bruised Ginger and Lemongrass on top of the Rice. Cook in the rice cooker with the lid ever-so-slightly open until done. Once done, remove and discard the Ginger and Lemongrass. Let the Rice cool in the cooker for 10 minutes. Then, using a wet fork or chopstick, lightly fluff-up the grains. Dish out onto a serving dish and keep warm until needed.  

Assembling the Nasi Lemak
Place 1 or 2 scoops of Rice in the centre of a plate. Arrange the Sambal either on the side or on the Rice. Then arrange the Egg, Cucumber slices, fried Peanuts and Ikan Bilis on the side. 

Friday, 1 August 2014

Banana Cake

This cake deserves a mention of its own. It may be the usual never-fail Banana Cake we've baked at home for years, yet no one complains when this cake appears on the table at tea, and that's saying something in a household of finicky eaters. Something good.


Where Nigel's Black Banana Cake combines hazelnuts, chocolate and bananas for a rather delicious mouthful of cake, this one is really all about the banana. Unlike its counterpart, this cake is delicate, soft and pillowy. It won't cut as well as the other, so some amount of gentleness is required.  

Yet, this is one of the most perfectly sublime cakes I've ever had. This is not an all singing, all dancing cake. It's as plain as plain can be and there in lies its remarkable beauty. Despite this I am guilty of relegating it into the ordinary whenever a quest for the extraordinary takes over. 

Here in Malaysia, it is all too easy to scoff at a cake like this because the fruit and cake is readily available. Step into any neighbourhood sundry shop and you're likely to see a mass-produced, plastic wrapped version sitting on its shelves, but homemade it always better!

This recipe is what I use and slightly adapted from my Domestic Science Cookbook Resipi Harian.

BANANA CAKE

120g Plain Flour
1 Egg
1/2 teaspoon Baking Powder
1/4 teaspoon Soda Bicarbonate
90g Butter
90g Caster Sugar
1 tablespoon Milk
1 teaspoon Lemon Juice
3 - 4 ripe Bananas, mashed

Preheat the oven to 150 Celsius. Butter, flour and line a 20cm loaf tin. Set aside.

Sift Flour, Baking Powder and Soda Bicarbonate. Set aside.

Pour Milk into a small bowl and add Lemon Juice. Set aside.

Cream Butter and Sugar in a bowl until pale and fluffy with an electric mixer. Add in the Egg and beat well until combined.

With a spatula, gently fold in the Flour mixture until mixed through. Then, carefully fold in the Milk and Lemon Juice. Lastly, fold in the mashed Bananas. Ensure the batter is well-combined.

Pour batter into the prepared tin and bake for about 30 - 40 minutes or until a skewer poked through the centre of the cake comes out clean. Cool in the tin for about 20 minutes before turning out onto a wire rack to cool completely.


Thursday, 31 July 2014

Ending festivities on a sweet note

This is what Malaysians would call being 'gatal' meaning having 'itchy' fingers or fingers that can't keep still. Not only did I make two types of rendang for Hari Raya, but also some Pineapple Jam Biscuits, which started off as tarts and mutated into biscuits.


There's no real story to this other than me just wanting to eat Pineapple Jam Tarts - just like the rendang - and since I have pretty high standards for tarts I decided to make them myself... on Hari Raya evening... while watching NCIS Season 6. I do so adore Mark Harmon and have done for a long time, so watching back-to-back repeat episodes - while rolling biscuits - was a blissful way to spend a quiet evening at home. (That and the earlier remark should give you an inkling of just how much time I spend in front of the TV in a week - almost zero!)

The idea for these biscuits came from here. I didn't however follow the recipe for the pastry because I couldn't bring myself to use that much of Condensed Milk. 

Now, don't get me wrong. I LOVE Condensed Milk, but only in my hot drinks and to make into a faux dulce de leche for Banoffee Pie. (Though I'm quite sure I'm going to break this rule soon when I attempt making the Kueh Lapis Batavia/Spekkoek, but let's not talk about that now.)

Let's talk about these lovely biscuits. They were lovely. Buttery, crumbly, short kind of lovely. I'm so happy they didn't end up in the dustbin, where some of my more uncontrolled baking experiments go.


That said, the endless rolling of jam and dough made me restrict myself to baking only one tray that night, with the remainder left for the next day. I KNOW you can make these smaller and more delicate-looking. That was the initial aim. However, mine turned-out roughly the size of ping-pong balls and ultimately looked similar to Penang's famous tau sar pneah. Maybe I should call these pineapple pneah?

PINEAPPLE JAM BISCUITS

450g Plain Flour
230g Salted Butter, cold and cubed
3 or 4 tablespoons Icing Sugar, sifted
A pinch of Salt
1/2 teaspoon Vanilla Essence
1 Egg Yolk
2 tablespoons Condensed Milk
3 tablespoons Vegetable Oil

500g Pineapple Jam

1 Egg
Vanilla Essence
Some Black Sesame Seeds

In a large bowl, mix the Plain Flour and Salted Butter with your fingers until it resembles breadcrumbs. Add the Salt and Icing Sugar. Using your fingers, gently mix both through the Flour/Butter mixture. Make a well in the centre of the Flour/Butter/Salt/Icing Sugar mix and put the Vanilla Essence, Egg Yolk, Condensed Milk and Oil in. Using your hands, bring everything together to form a ball of dough that cleanly leaves the sides of the bowl. Set aside. 

Roll Pineapple Jam into little balls and place them on a plate. 

To assemble the biscuits, take a pinch of dough, roll it into a ball and then flatten it out with the heel of your palm. Place a ball of jam in the centre and carefully close the dough around it. Lightly pinch any holes close and roll the dough/jam ball until the dough looks nice and smooth. Place it on a very lightly greased baking tray. 

Repeat until all the dough and jam is used up. 

Crack the Egg in a bowl and add in a drop of Vanilla Essence. Mix until well-combined. Brush the tops of the biscuits with the egg wash and sprinkle some Black Sesame Seeds on them.

Bake the biscuits in a 150 Celsius oven for about 20 - 25 minutes or until the egg wash looks a light golden in colour. Remove from the oven and cool on the tray. Once cool, store the biscuits in an airtight jar. 

Notes

  • You may have a little dough or Pineapple Jam left over. Put it in a container and store in the fridge. Use up the dough within 5 days. The Pineapple Jam can be left longer if it is a sweet jam. If it is sour, then use within 2 weeks. 

Wednesday, 30 July 2014

Rendang Tok

31 July 2014 - Updated the photo.

So I said in the previous post that I wasn't going to attempt rendang again anytime soon, but I did. What was I going to do with all that Galangal and Kaffir Lime Leaves anyway? 

This time round I made a Rendang Tok. My version of it anyway, which is give-or-take some of the spices. I liked the look of Ummi's rendang, so that's the recipe I used with a little tweaking.

Some people liked this more than the previous version! Well well well. That's not too bad. Looks like my rendang cooking skills are not too shabby after all.

No nice photos unfortunately, because I was tired from all the prep and stirring towards the end. Also, while the Beef was cooking in the oven, I made some very quick, very delicious Pineapple Jam Biscuits


RENDANG TOK

Meat Marinade
800g- 1kg Beef Brisket, cubed
3 teaspoons Tamarind Paste
2 teaspoons Brown Sugar
1 teaspoon Salt

Dry Spices (to dry roast and grind fine)
2 tablespoons Coriander
1 tablespoon Cumin
1 tablespoon Fennel
1 tablespoon Black Pepper

Wet Spice Paste (to blend)
20 dried Red Chillies, soaked in hot water and drained
1 teaspoon Turmeric Powder
4 medium Red Onions
4 cloves Garlic
1 thumb-sized piece Ginger
1/2 thumb-sized piece Galangal
3 stalks Lemongrass

Other ingredients
500ml thick Coconut Milk
70g Kerisik
6 Kaffir Lime Leaves
3 Star Anise
4 Cardamon pods
Palm Sugar, to taste
Salt, to taste
Oil

Meat Marinade
In a large bowl, mix the Salt, Sugar and Tamarind Paste together. Add in the Beef cubes and toss till well mixed. Set aside. 

Dry Spices
Dry roast the spices over medium heat till aromatic. Cool and then grind into a fine powder in a dry spice blender. Set aside.

Wet Spice Paste
Slice, cut or snip all the spices. Put all the ingredients into a blender. Add a little water to get the blender going and blend until you get a paste. Set aside. 

Cooking the rendang
Heat a large pot over medium heat and add Oil. Then add the Wet Spice Paste, Star Anise and Cardamon. Fry spices for a minute. Then add in the Dry Spices and Kaffir Lime Leaves. Fry a few minutes more until slightly aromatic. 

Add in the Beef and stir until the meat is well coated with the spices. Then stir in all of the Coconut Milk. (The Coconut Milk should just cover the meat) 

Cover the pot with its lid and place in a 160 - 170 Celsius oven for about 1 hour or until the meat is slightly tender.

Remove pot from the oven and then transfer the contents of the pot into a wide flat-bottomed wok. On low to medium heat, stir the gulai until the Coconut Milk starts evaporating little by little. This should take about 20 - 30 minutes. Just before the 20 - 30 minutes is up - when there's still liquid in the wok - add in the Palm Sugar and Salt to taste. 

Lastly, add in the Kerisik. The mixture will suddenly start thickening. Keep stirring until the liquid is evaporated and the Oil starts floating to the top and sides of the rendang

Switch off the fire, cover the wok with its lid and let it sit on a cooler part of the stove until it comes to room temperature. Before eating, warm the rendang up a little and serve with hot boiled rice or nasi himpit or lemang.    

Notes
  • I used my trusty cast-iron Le Creuset pot for the first part of the stove and oven cooking. It helped make the meat nice and tender. I then switched to a wide flat-bottomed wok.
  • You can use just one pot for the whole cooking process, but then you have to stir for hours until everything comes together. I prefer to forget the rendang for at least an hour, so into the oven it goes. I'm just a bit lazy like that. Also nothing stuck to my pot or wok, which made washing up a breeze.  
  • I would use slightly less Kerisik the next time, as I felt 70g was a little bit too much. 


Monday, 28 July 2014

Selamat Hari Raya and a tale of Beef Rendang


It's Hari Raya. The time of the year when one eats all the goodies of the season in the form of nasi himpit, lemang, kuah kacang, kueh, and of course rendang

There are all sorts of rendang, but I'm not going to get into that today. What I am going to get into is that a week ago I realised I might actually miss out on all these goodies especially the rendang. Now, I don't celebrate Hari Raya, but going without rendang during the season was just impossible to deal with. So I decided to make my own. 

This is not my first attempt at rendang and as I do love a good Beef Rendang, I've tried to make it before but not quite so successfully. It's quite an effort to get the flavour and tenderness of the meat right. 

Armed with research from here and here, I made what I think is the best rendang I've ever made, ever. It had a gorgeous flavour and above all, the meat is fork-tender. Both use similar ingredients with the exception of the quantity called for and two or three additional spices.  

There were a few stressful moments while making this dish though.

First, I panicked and kept checking on it every five to ten minutes, when the recipe said to leave it well alone. (This is when I sent an S.O.S. to a friend on Facebook to find out if I should be looking at it cook every few minutes or not. I was told yes, a little bit too late!) Why? Because I finally DID leave it alone only to find at the end of the first hour that the bottom was starting to get burnt. Oh dear, oh dear.

So after a quick check on the tenderness of the meat, I turned on the oven and into it went the pot for its second hour of cooking. 

After the second hour was up, the contents of the pot went into a flat-bottomed wok for caramelising, 'frying' of the Spice Paste and reducing the gravy.

All in all, the rendang took about three and a half hours to make from beginning to end, including prep time. I was relieved and tired once it was done. The dish was delicious this evening with some boiled rice, but hopefully better tomorrow once it has a chance to have a good night's rest. This and a Butter Cake is what I'm taking over to Aunty Jaibun's later today.

Don't think I'd repeat this anytime soon. Maybe next year Raya is soon enough? 

BEEF RENDANG

1.2kg Beef Brisket, cubed
2 teaspoons Salt
4 teaspoons Sugar
3 teaspoons Tamarind Paste
80g *Kerisik

Spice Paste (to be blended)
4 medium red Onions
6 fresh Red Chillies, de-seeded
28 dried Red Chillies, soaked in hot water and drained
2 thumb-sized pieces Ginger
1/2 thumb-sized piece Galangal
6 cloves Garlic 

Other ingredients
2 teaspoons Turmeric Powder
6 Kaffir Lime Leaves
4 stalks Lemongrass, bruised
4 slices Galangal
5 tablespoons Palm Sugar
2 teaspoons Salt
1/2 teaspoon White Pepper
4 tablespoons Oil
1 litre Coconut Milk, divided

In a large bowl, mix the Salt, Sugar, Tamarind Paste and Kerisik together. Add in the Beef cubes and toss till well mixed. Set aside.

In a blender, blend all the ingredients for the Spice Paste. If needed, add a little water to get the blender going. Blend until you get a fine paste. Set aside. 

Heat a large pot over medium heat and add Oil. Then add the Spice Paste. Fry the Spice Paste for about 1 minute and then add all the other ingredients into the pot. Cook for about 3 minutes, then add 750ml of the Coconut Milk. Add the Beef and stir through until the meat is well-coated. 

Cover the pot and cook on very low heat for 1 hour. Add in the remaining Coconut Milk and adjust the seasoning. I then put the pot into a 170 Celsius oven to cook for a further hour or until meat is tender.

After the second hour of cooking. Remove the pot from the oven and transfer everything in it to a flat-bottomed wok. Turn the heat on to low and start stirring the rendang every 5 - 10 minutes to prevent any sticking. Keep stirring until the gravy reduces and changes into a darker, more chocolate colour. The rendang is done once the gravy dries up leaving the meat with a caramelised coating. Cover and cool in the wok. Before eating, warm it up a little and serve with hot boiled rice.

*Kerisik - Make your own kerisik by toasting about 80g of dessicated coconut in a dry wok until it is aromatic, brown and well-toasted. Transfer to a pestle and mortar. Pound the crisp coconut lightly until you get a semi-fine powder. 

Notes
  • This is my first time cooking Beef Brisket. It is so far the best cut of beef I've used to make a rendang.
  • I used my cast-iron Le Creuset pot for the first two hours of cooking. Next time I'd put the pot straight into the oven for the first two hours of cooking to prevent the rendang getting burnt.
  • I would experiment with slightly less Coconut Milk next time. I used Ayam Brand Coconut Milk
  • I didn't use the Dark Soya Sauce called for in Not Quite Nigella's recipe, as I wanted the dish to caramelise on its own. 

Now, just what do I do with all that Galangal and Kaffir Lime Leaves I had to buy?